This Article Contains
What the Gaze Actually Changes: Distance
The gaze in a profile photo is a small detail, but it is one of the key factors that determines the perceived "distance" between you and the viewer. Even with the same face and the same smile, whether the gaze is directed at the camera or to the side changes the impression the viewer receives.
There is no single "correct" gaze direction. The choice depends on what you want to communicate to your audience in that specific context. Settling on this one thing reduces a lot of the indecision when it comes time to select from your candidate photos.
It is also important to evaluate the gaze and the expression together. Even if only the eyes are directed toward the future, a stiff mouth and tense shoulders make the whole thing feel overly staged. When gaze, expression, and posture all point in the same direction, the overall impression of the photo comes together.
The Role of Each of the Three Directions
Direct eye contact creates a face-to-face connection with the viewer. It is the right choice for situations where you want people to think "I want to consult this person" or "I want to trust this person" — business cards, legal or medical profiles, recruitment pages, and similar contexts. It is the default option when you want to project trustworthiness straightforwardly.
An averted gaze makes it easier to project the impression of "a thinker," "someone creating something," or "an expert." It suits places where you want to convey thought and expertise, such as author bios, instructor introductions, and profiles for designers or consultants. However, looking away too much can make you appear to be avoiding the viewer, so the degree of aversion needs careful calibration.
Looking slightly upward can create a sense of forward momentum, optimism, and vision. It works well for event announcements, executive profiles, and interviews in business media. Keep the angle subtle — just a few degrees — as a strong upward angle makes the staging too obvious.
FIG. 018A diagram mapping the impression differences produced by three gaze directions: direct eye contact, averted gaze, and upward gaze.
Choosing a Gaze Based on Medium and Layout
The choice of gaze direction also relates to the layout of the medium where the photo will appear.
On websites and business cards, a layout with the face photo on the left and the name, title, and body text on the right is common. In this case, a photo where the face is turned slightly toward the right (toward the inside of the layout) is easier to use. If the gaze is directed outward (to the left), it pulls attention away from the text.
For circular social media avatars, the gaze direction still comes through even at a small size. Direct eye contact is more likely than an averted gaze to convey a sense of "this is someone I can approach" even at thumbnail scale.
When the photo is displayed large — such as on a speaker page or author bio — the averted gaze becomes more viable. At a larger size, the complexity of the expression and the depth of thought can read through the photo.
Common Pitfalls with the Averted Gaze
There are two things to watch out for when selecting a photo with an averted gaze: "too much" and "only the eyes are moving."
If the gaze is averted too far, the photo becomes unclear — the viewer is left with the impression that "this person is not looking at me." The angle of aversion should feel like "looking slightly to the side or diagonally up" to remain usable.
The other pitfall is keeping the face pointed at the camera while moving only the eyes sideways. This makes the whites of the eyes prominent and creates an unnatural look. When directing the gaze to the side, turn the face slightly in the same direction for a more natural result.
The gaze is a small handle inside the photo that adjusts your distance from the viewer.
Verify by Placing the Photo in Its Actual Context
Before the shoot, settle on one thing: "What do I want to communicate to the viewer in the place where this photo will be used?" If you want people to consult you, go for direct eye contact. If you want to project "thoughtful expert," go for an averted gaze. If you want a sense of forward momentum, look slightly upward. Deciding on your candidates before stepping in front of the camera makes the selection process much easier afterward.
During the shoot, do not move only your eyes — also adjust the direction of your face. If you are shooting with an averted gaze, particularly verify that the face direction and gaze are aligned.
After delivery, place the photo in its actual context and check where the gaze is directed. Confirm that the gaze is not escaping off the edge of the screen and that it naturally guides attention toward the content you want people to read. Keeping several candidates with different gaze directions makes the final selection much easier.
- Direct eye contact projects trust, an averted gaze projects thought and expertise, and an upward gaze projects forward momentum and vision.
- Depending on the layout of the face photo relative to text, a gaze directed toward the inside of the frame may be more practical.
- After delivery, place the photo in its actual context and verify that the gaze aligns with the information you want the viewer to read.
Related Diagrams
 FIG.010The "Open Your Eyes Wide" Trap: When the Upper and Lower Face Don't MatchThe more you open your eyes, the more the wide-eyed upper face can fall out of sync with the smiling mouth.
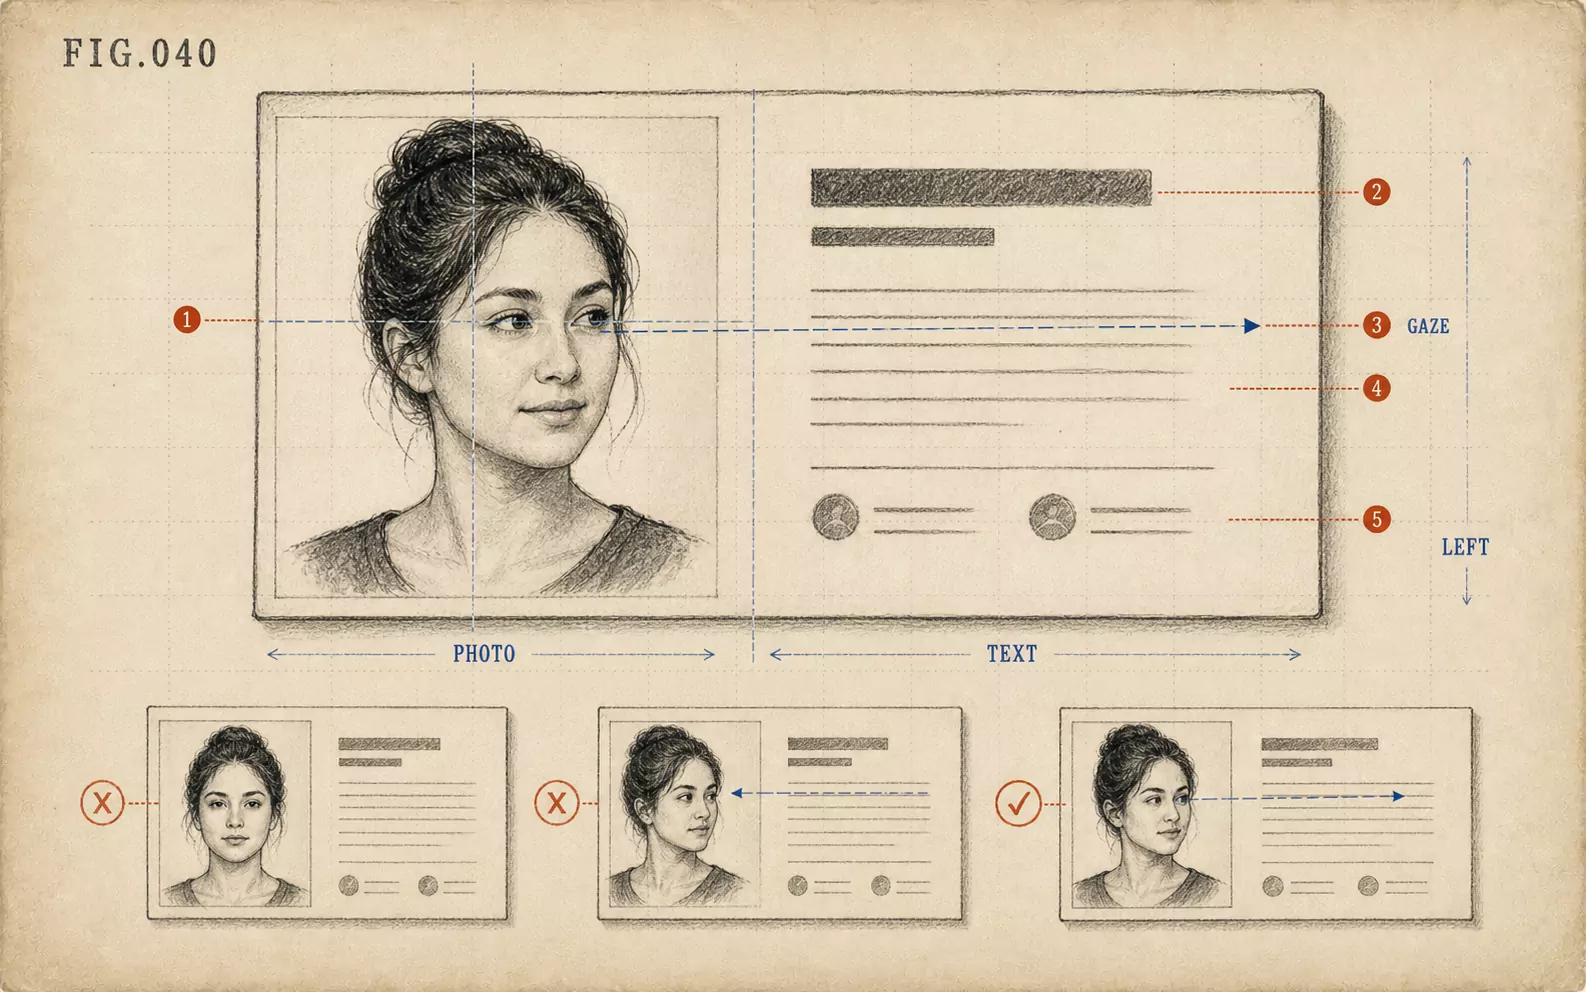 FIG.040On LinkedIn and Business Cards, Your Face Is Placed on the "Left"On websites and business cards, face photos tend to be placed on the left, making photos where the face turns inward easier to use.
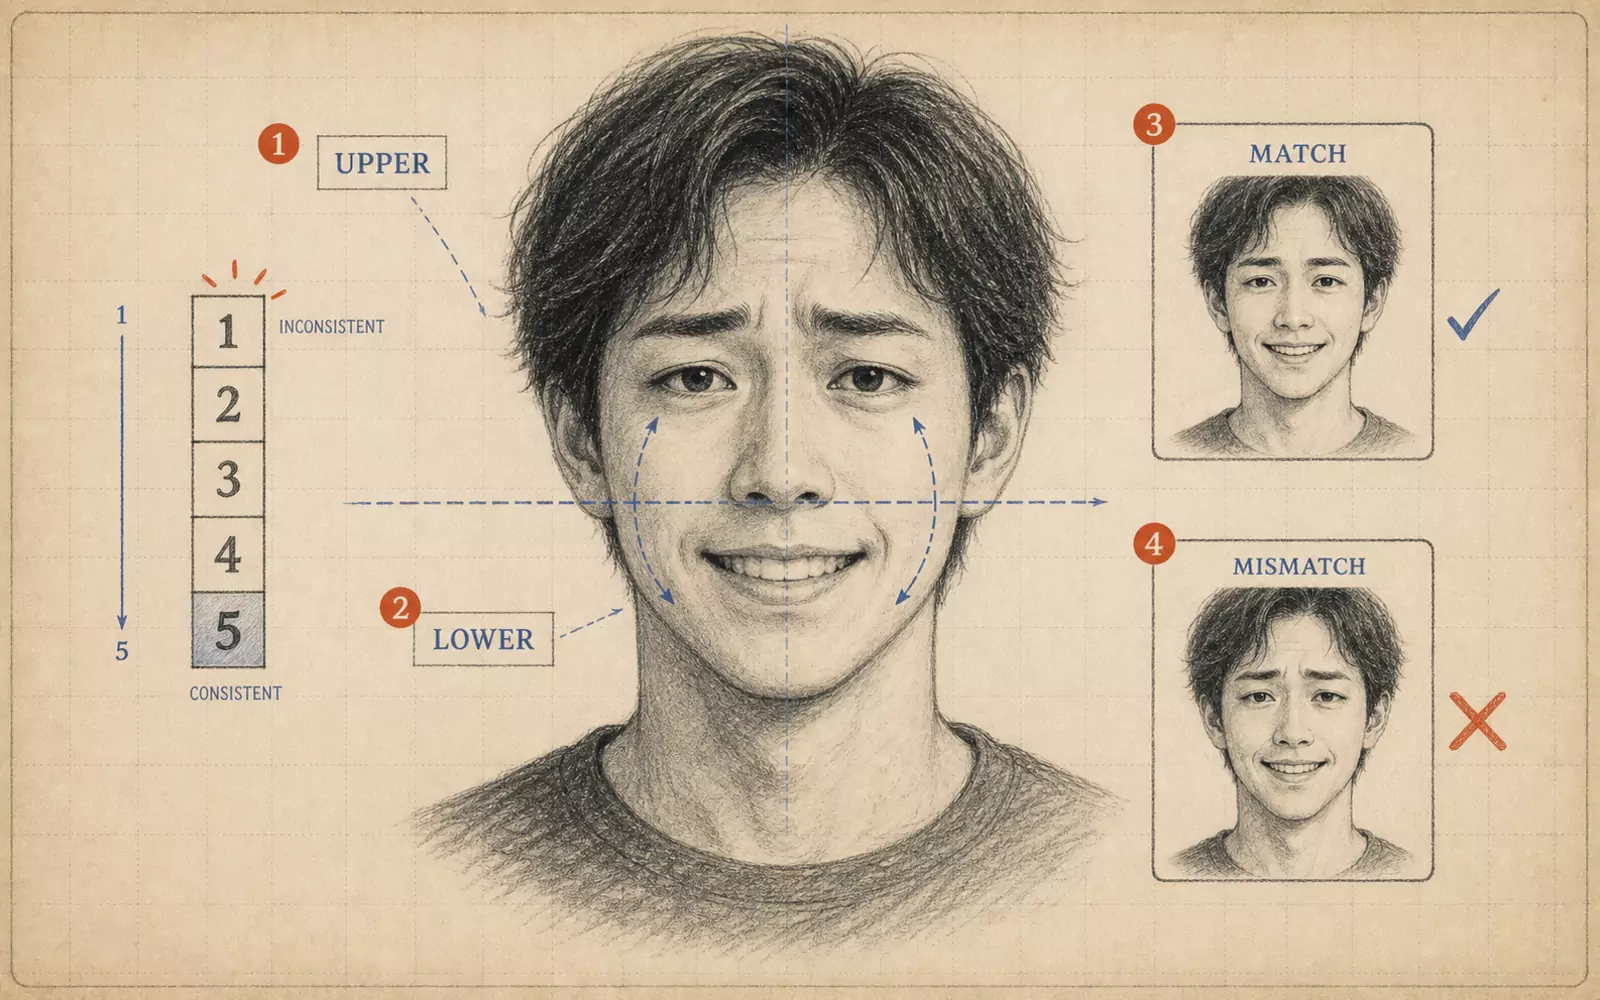 FIG.060Are the Upper and Lower Halves of Your Expression Aligned?When reviewing photos, look at the upper and lower halves of the face separately. If only the eyes are wide open while the mouth smiles, remove it from the candidates.