This Article Contains
Why Creases Form on the Neck
In the vast majority of cases, neck creases in photos are caused by one thing: only the neck is moving. It is not a problem with the neck itself — it is something that happens whenever the direction of the body and the direction of the face fall out of alignment.
In profile shoots, it is common to angle the body slightly and then face the camera. When the feet and hips stay pointing diagonally while the face swings to the front, the skin on one side of the neck gets pushed together. That compression is what shows up as creases.
Rather than blaming the creases themselves or trying to change the shape of your neck, learning how to build a stance that doesn't concentrate the twist in the neck is the more direct solution. That alone makes most creases stop appearing.
What Happens When You Turn Only the Face While the Body Stays Angled
When the body is still pointing diagonally and you try to face straight forward, the neck has to rotate as far as it can go. The harder that twist, the more the skin on the opposite side — the side away from the direction of the turn — gathers into vertical or diagonal creases.
A large neck movement also pulls tension into the shoulders. From the photographer's perspective, the shoulders can appear to rise and the neck to shorten. Even if the expression is working, stiffness tends to linger around the neck and shoulders in the final image.
A heavily twisted neck can also give the impression that the neck looks shorter or the shoulders are braced. Beyond the creasing issue, it affects the overall impression of the entire pose.
FIG. 029A diagram explaining why twisting only the neck causes creases on the opposite side.
Building Direction from the Feet and Shoulders Relieves the Neck
The fix is straightforward. Rather than turning only the face, bring the direction back through the feet and shoulders first.
Start by angling your feet and hips slightly toward the camera while bringing only the shoulders a little further in the camera's direction. By the time you get to that point, enough of the body is already facing the camera that the final turn of the face covers far less distance. Less neck movement means fewer creases.
When selecting from the delivered photos, check the line of the neck alongside the expression. A photo where the face is working but the neck carries a strong twist can be difficult to use. When you want the neck to look slim and long, keeping the back of your head lifted while gently tucking the chin tidies the neckline without adding to the twist.
Why Counting on Retouching to Fix It Tends to Backfire
The assumption that "neck creases can be fixed in post" often doesn't hold up in practice. Smoothing neck creases naturally requires reproducing the skin texture, shadows, and pores beneath them — and over-smoothing makes the neck look artificially flat. The difference in texture between the neck and face usually ends up looking stranger than the original crease.
Beyond that, if you notice after the shoot that the neck is heavily creased, your only option may be to switch to a different shot. Taking care during the shoot is the more fundamental solution.
Retouching is a legitimate tool, but doing what you can at the shooting stage consistently leaves you with more naturally looking photographs in the end.
Dealing with neck creases is not about removing them afterward — it is about building your direction from the feet and shoulders so they don't appear.
How to Check During the Shoot and When Choosing Photos
If during a shoot you feel unusual tension in your neck, don't start correcting from the face — go back to the feet. If they have drifted toward facing straight on, angle them back slightly, bring the shoulders around to face the camera, and then turn the face. Working through that order naturally reduces the load on the neck.
If you want to tell the photographer, "Could we try one where the neck creases are less visible?" is specific and easy to act on. "How does my neck look?" is far more actionable than "Do I look natural?"
After delivery, check the neck line at the same time as the expression. Prioritise photos where the face, shoulders, and neck connect naturally. Before ruling out a shot because of strong creasing, check whether a different frame from the same expression exists.
- Neck creases are not a problem with the neck itself — they come from keeping the body angled while turning only the face, concentrating the twist in the neck.
- Building the direction from feet, hips, and shoulders toward the camera first minimises neck movement and keeps creases from appearing.
- When choosing photos, check the neck line as well as the expression. Keep photos where the face, shoulders, and neck connect naturally.
Related Figures
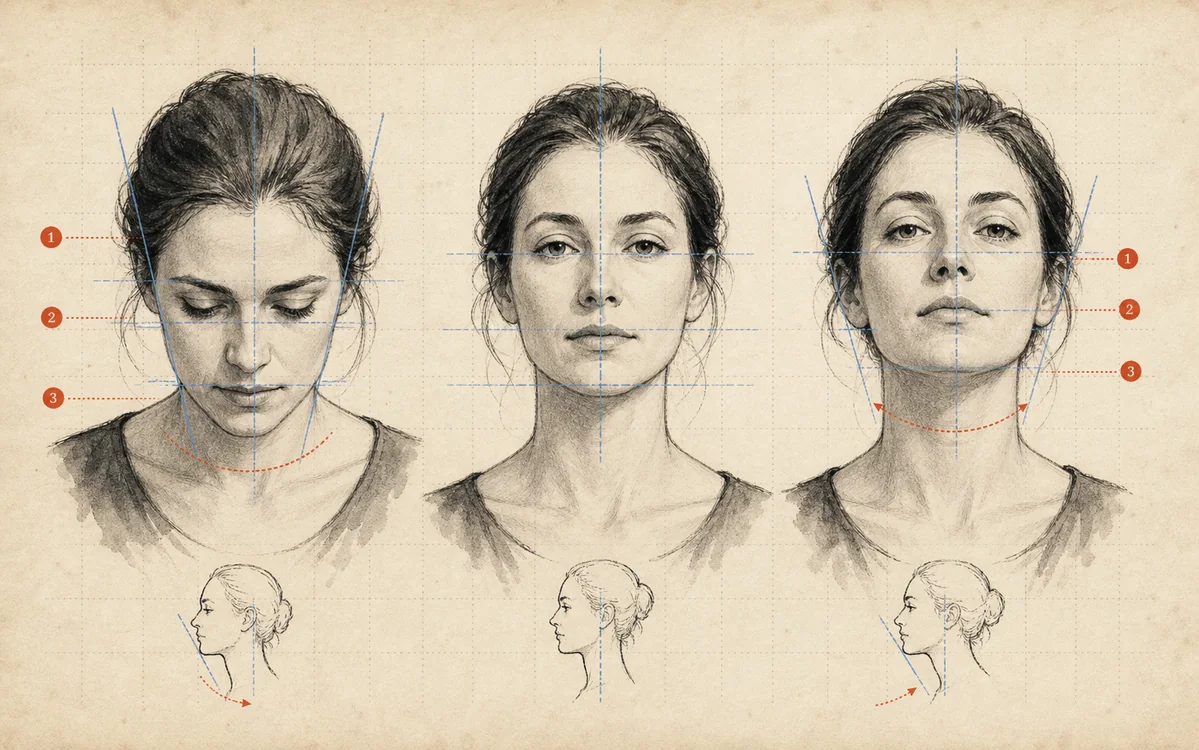 FIG.003Pull the Chin Back 1 cm and the Jawline Looks Cleaner in PhotosKeep the back of your head lifted and move only the tip of your chin back — without dropping the whole neck — and the jawline and neckline both tidy up naturally.
 FIG.027When You're Not Sure How to Stand, Build Your Pose from the Feet UpThere is an order to how you stand. Work through feet, hips, shoulders, chin, eye line, and expression and you won't get lost.
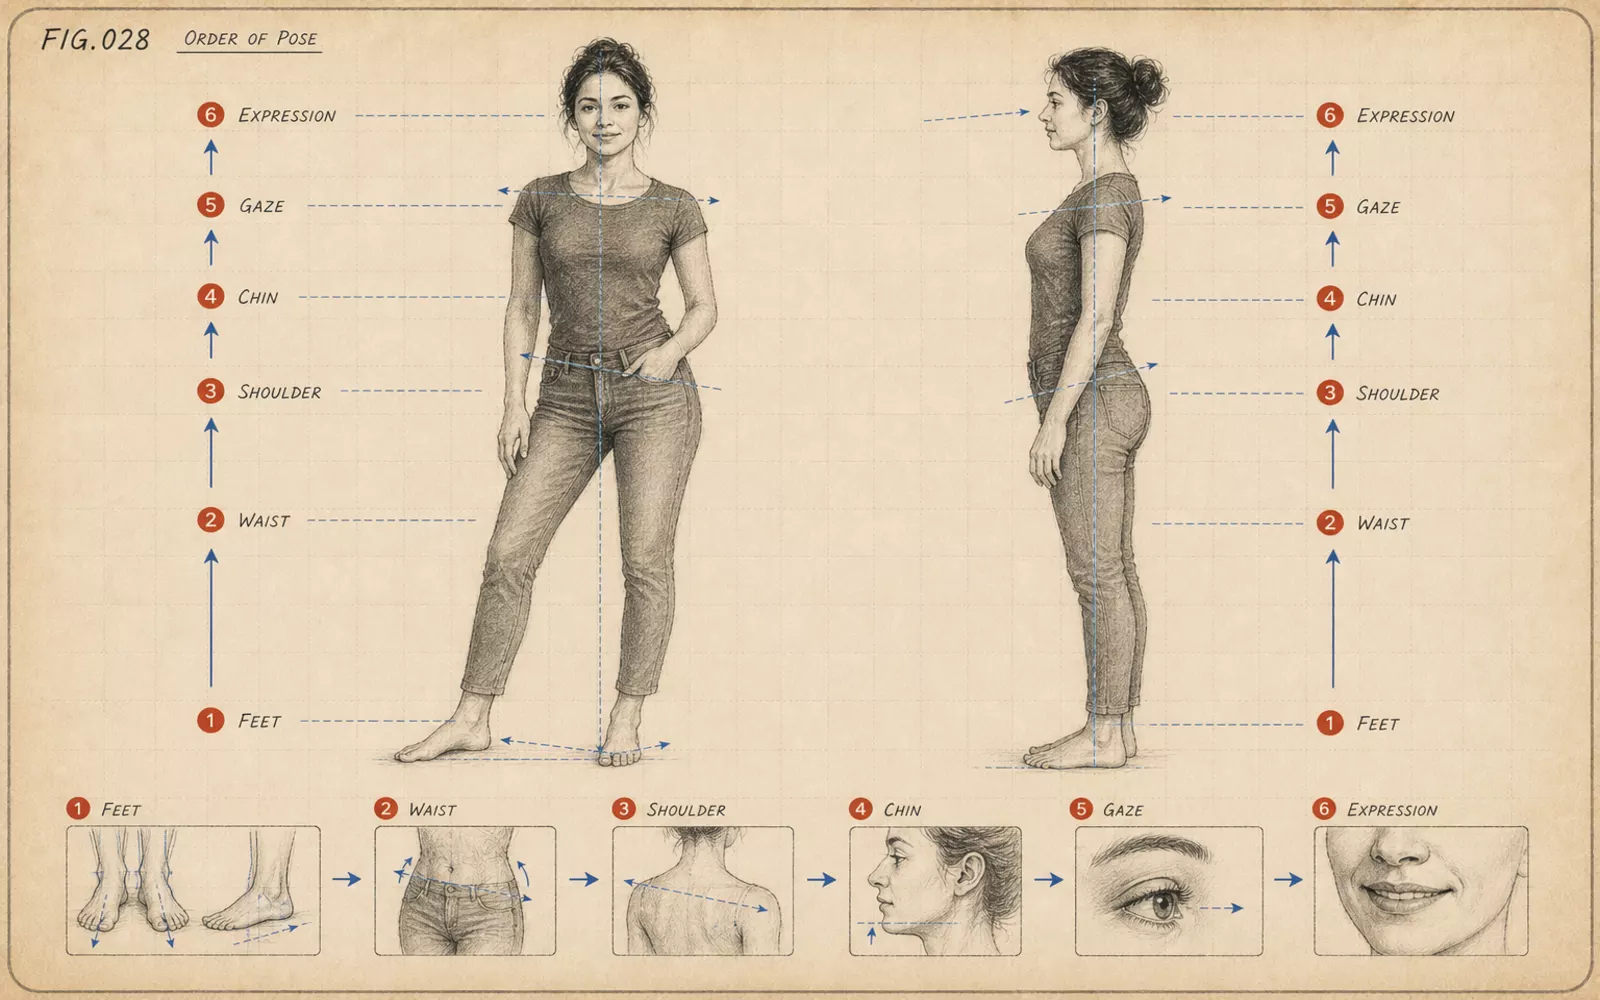 FIG.028The Order to Build Your Pose: Feet → Hips → Shoulders → Chin → Eye Line → ExpressionBuild the pose starting from the feet, then hips, shoulders, chin, eye line, and expression last. Saving the expression prevents facial fatigue.