This Article Contains
"Tuck Your Chin" Does Not Mean Tilting Your Neck
Pulling your chin in by about 1 cm tends to make your jawline look cleaner in photos. This is not about changing your bone structure or mastering some special technique to make your face look smaller. It is simply a matter of slightly adjusting the angle your face presents to the camera lens.
A common misconception is that "tuck your chin" means tilting your neck forward. Try it and you will find that this approach creates extra shadow under the jaw and makes your neck look compressed.
The correct movement is to keep the back of your head lifted while bringing only your chin tip slightly back. Your neck does not move. Think of just your chin tip shifting a few millimeters to about 1 cm. That small motion shows up in photos as a visible change in your jawline.
How Your Jawline Changes Through the Lens
Photos do not show the face you see in a mirror straight ahead — they capture the face as seen from the lens position. Understanding this difference helps clarify why chin placement matters.
When your chin is raised, shadow intensifies under your nose, your face looks wider, and your eyes appear relatively smaller. Conversely, a slightly tucked chin lets natural shadow fall along the jaw-to-neck line, making the jawline look more defined — and at the same time drawing the viewer's eye to your expression.
If the photographer is holding the lens slightly above your eye level, this effect becomes even more pronounced. The higher the camera, the more a subtle chin tuck tidies up the lower portion of your face.
FIG. 003A diagram showing how the jawline and neckline appear when the chin tip is brought slightly back. Left: chin raised. Right: correct chin tuck.
The Back of Your Head Is the Reference Point for Everything
Before a shoot, when you check yourself in the mirror, look at the back of your neck as well as your face. If the back of your head is already dropped and you then try to tuck your chin, your neck compresses and you end up looking uncomfortable in the photo.
Start by consciously lifting the back of your head — imagine pulling the area behind your ears toward the ceiling. While holding that position, draw just your chin tip about 1 cm back. The order matters. When the back of your head is the anchor, tucking your chin will not compress your neck.
Direct your gaze at the camera lens. Tucking the chin tends to pull the gaze downward, so holding two thoughts simultaneously — "lift the back of my head" and "look at the lens" — will keep you stable.
1 cm Is Enough — Over-Tucking Backfires
The most common chin-tuck mistake comes from the desire to look slimmer: people tuck too far. Over-tucking creates a shadow that resembles a double chin or causes creasing at the base of the neck.
Another mistake is tilting the whole neck forward in an attempt to tuck the chin. This points your face downward, making you look up at the camera with a tense expression.
What matters in a photo is not making your face look as small as possible. It is creating a state where your jawline reads naturally, your neckline feels relaxed, and your eyes carry expression. For that, an adjustment of 1 cm — at most 1.5 cm — is all you need.
The cue for tucking your chin is not "lower your neck" — it is "lift the back of your head and bring only the chin tip back."
Three Mental Cues to Use During a Shoot
Having three ready cues for moments of uncertainty keeps you grounded on set.
- Align your gaze with the lens — Locate where the camera is, then direct your eyes there. Once your gaze is settled, your chin tends to find a natural resting position on its own.
- Lift slightly behind the ears — This is the sensation of keeping the back of your head high. With this awareness, you can tuck your chin without compressing your neck.
- Bring your chin back by the thickness of a single sheet of paper — Use this as a reminder that the movement is minimal: just a few millimeters to about 1 cm.
If you want to practice at home beforehand, place your smartphone at eye level and take timed shots. Shoot ① chin raised, ② chin tucked too far, and ③ head lifted with only the chin tip brought back, then compare them side by side. You will clearly see how much a few millimeters matter in a photo — a great way to go into shoot day feeling prepared.
- Keep the back of your head lifted and bring only the chin tip slightly back — do not tilt your whole neck forward.
- Over-tucking can produce a double-chin shadow or neck creases, so aim for 1–1.5 cm of adjustment.
- Shooting three comparison shots beforehand gives you a feel for exactly how far to tuck on the day.
Related Diagrams
 FIG.010The Real Meaning of "Open Your Eyes Wider" Is Not About Upper and Lower Eyelid DistanceThe more you force your eyes open, the more your smile and your wide eyes can drift apart.
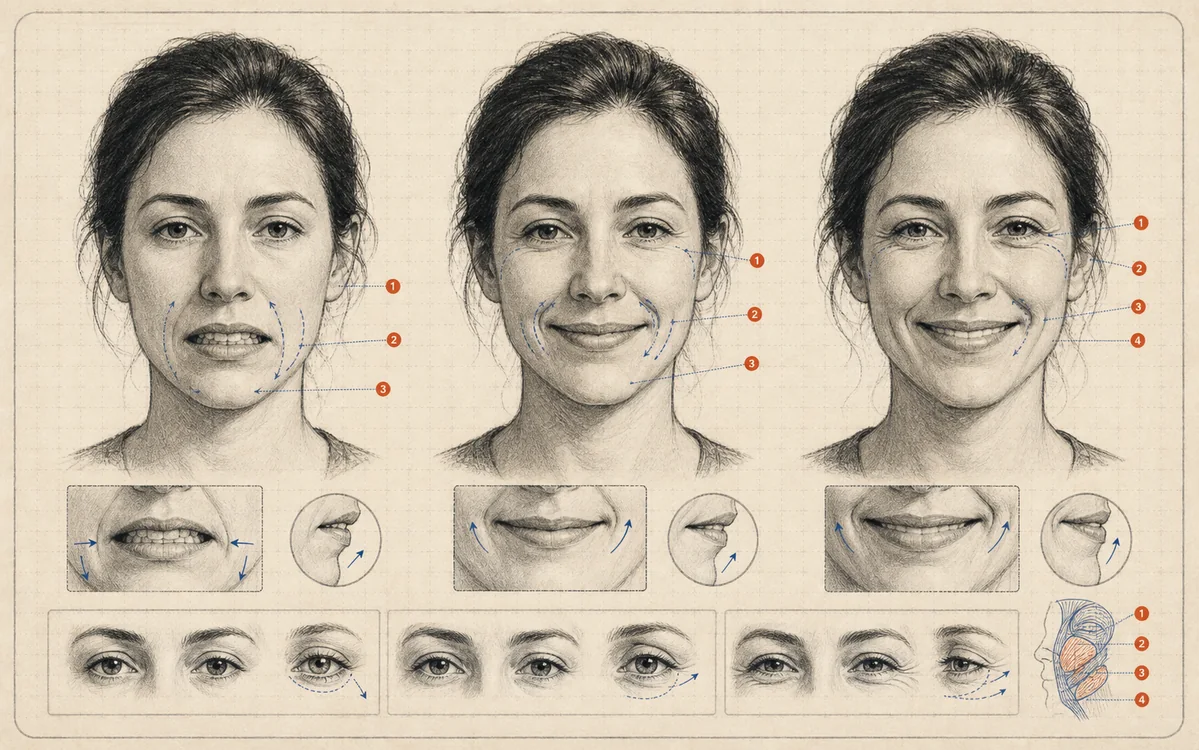 FIG.012Why "Please Smile" Freezes Your ExpressionA photo smile is not just about mood — it is shaped by lifting the cheeks, showing 3 mm of teeth, and catching the moment tension releases.
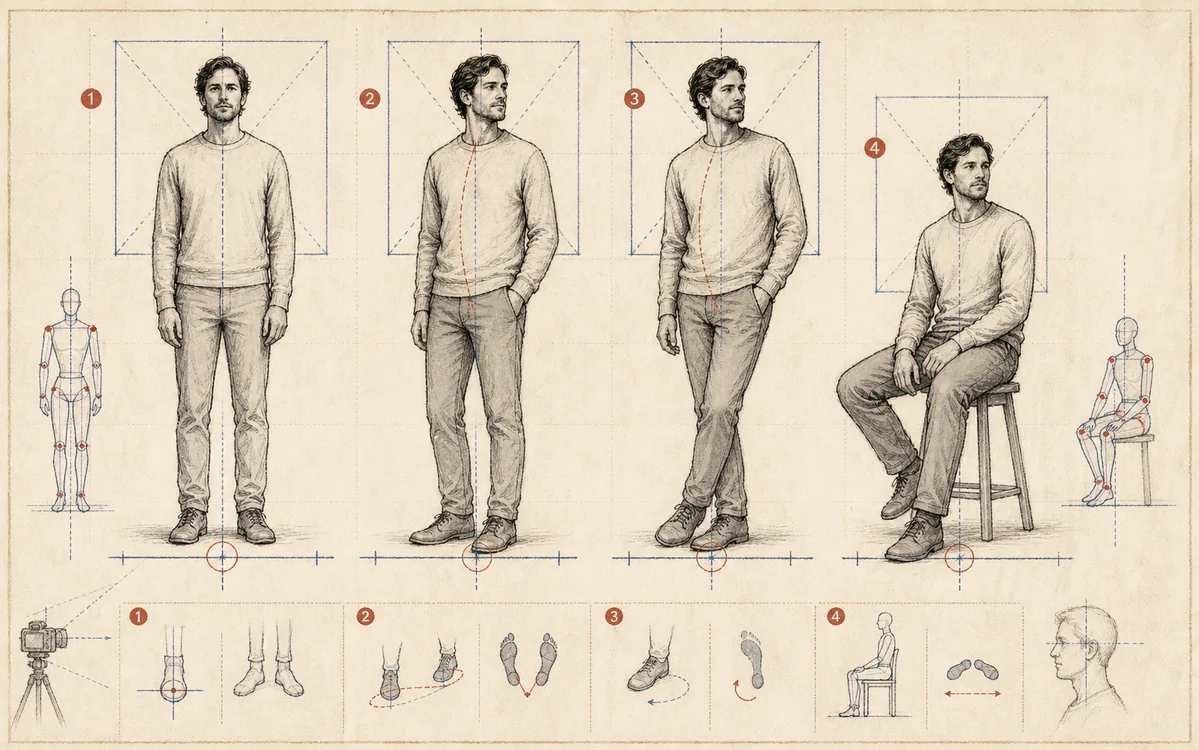 FIG.027When You Are Not Sure How to Stand: Building Your Pose from the Feet UpThere is an order to standing well. Work through feet, hips, shoulders, chin, gaze, and expression in sequence and you will never feel lost.