This Article Contains
What Happens When You Try to Smile with Only Your Mouth
When people consciously try to make a smile, most move toward pulling their lip corners sideways. But a natural smile is not made by the lip corners alone — it comes from the zygomaticus major muscle below the eye moving upward (see FIG.011).
A smile made only by pulling the lip corners sideways, without the cheeks rising, creates a temperature gap between the mouth and the eyes. Observers sense something like "that somehow looks like a forced smile." And the sustained effort of pulling the lip corners hard adds tension to the face, which can freeze the cheeks and the area around the eyes.
When you try to make a smile using only your mouth, stiffening can trigger the thought "I need to smile more," which adds even more tension — a vicious cycle. Changing how you make the smile breaks this loop.
Why Raised Shoulders Stop Your Face from Moving
Tension causes the shoulders to rise. When the shoulders rise toward the ears, the neck compresses and the area around the jaw becomes tense. When the jaw and neck are tense, it becomes harder to move the muscles around the face — specifically the zygomaticus major and the orbicularis oris.
In this state, when you try to make an expression, only the parts that can still move compensate — which means the mouth works extra hard. The cheeks stay frozen while only the lip corners move: this is the classic pattern of a tense smile.
Shallow breathing also plays a role. Shallow breathing leaves less margin to hold an expression. The stronger the pressure of "I have to keep smiling," the shallower the breathing becomes and the more the body tenses.
FIG. 114A diagram organizing how the shoulders, breathing, and cheeks affect the expression when you're tense, and how to reset them.
How to Release Shoulders, Breath, and Cheeks in Order
The reset sequence has three steps: raise your shoulders, then drop them → exhale slowly and fully → lift the cheeks. Follow this order.
First, deliberately raise your shoulders. Once they're fully raised, slowly let them drop. This "raise then drop" movement lets your body feel the position where the tension has released. Next, exhale fully. Leading with the exhale rather than an inhale works because exhalation relaxes the diaphragm and makes it easier for the tension in the upper body to release.
Finally, instead of pulling the lip corners sideways, move the cheeks slightly upward below the eyes. Showing about 3 mm of your upper front teeth is the benchmark for a professional photo — not too smiley, not too stiff. When the cheeks move, the area just below the eyes lifts slightly and a warmth spreads across the whole expression (see FIG.011).
The Risk of Being Told to "Smile More"
When a photographer says "smile more," most people move toward pulling their lip corners even harder. If the cheeks are already frozen, this results in an expression where only the mouth is emphasized. It may look like a smile, but it tends to read as lacking warmth.
Furthermore, the more often "smile more" is said, the more the thought "it's still not enough" is layered on, which increases the body's tension. It becomes hard to notice that you're not failing to smile — you're just going in the wrong direction.
When you're told "smile more," check the state of your shoulders before pulling the lip corners. If the shoulders are raised, drop them first. Once the shoulders are down, lifting the cheeks will produce a different result from the same "smile more" prompt.
Don't make a smile with your mouth alone — work through the shoulders, breathing, and cheeks in order.
The Reset Sequence Before and During a Shoot
Before the shoot, run through the three steps once. Ingraining the flow of "raise and drop the shoulders → exhale → lift the cheeks" in your body makes it easier to recall during the shoot. Practicing in front of a mirror at home also lets you check how much of your upper teeth show when you lift your cheeks.
If you feel yourself freezing up during the shoot, mentally run through the sequence "shoulders → breath → cheeks." You don't need to fix everything at once — starting with just the shoulders is enough. Even simply dropping your shoulders once between shots can change the next frame.
When selecting photos, check not only the smile around the mouth but also the state of the neck and shoulders. A photo where the shoulders are dropped and the neck area isn't compressed tends to look more natural in the expression as well. A photo where the shoulders are raised and the neck is compressed will read as lower in warmth no matter how much expression work went into it.
- A smile is made by lifting the zygomaticus major muscle below the eye — not by pulling the lip corners sideways. The order of shoulders, breathing, and cheeks matters.
- When tension raises the shoulders, the neck compresses and the muscles around the face become difficult to move. Dropping the shoulders first is the priority.
- When selecting photos, check not just the mouth but also the state of the neck and shoulders. Photos where the shoulders are dropped allow the expression to come through more naturally.
Related Diagrams
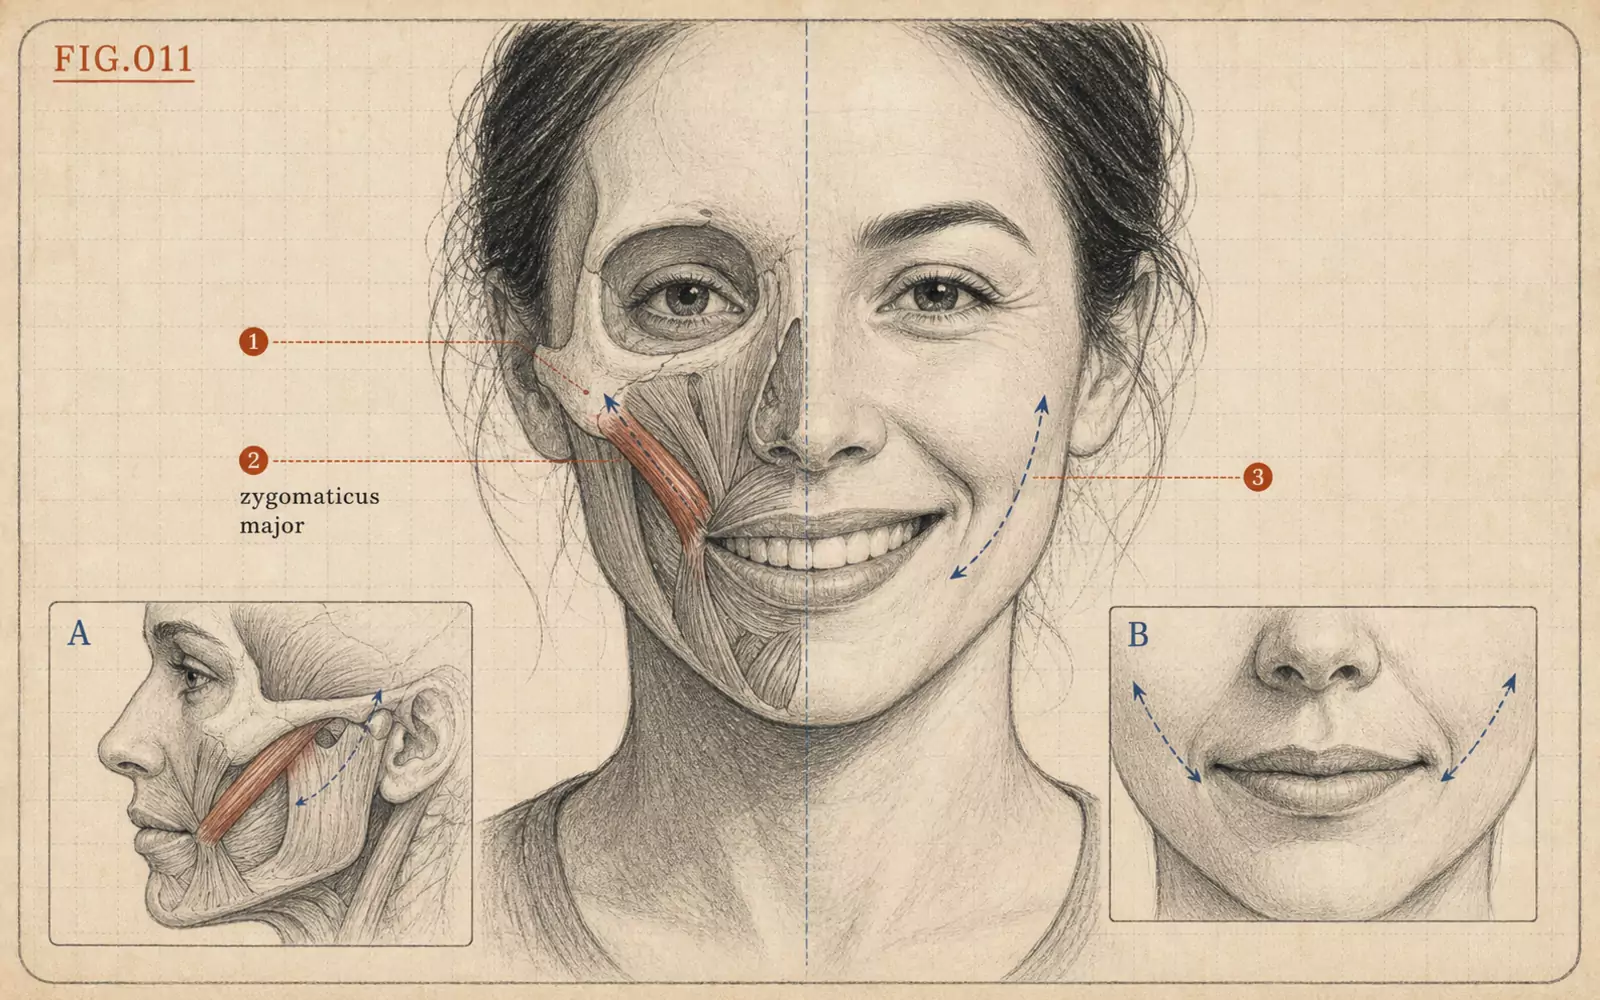 FIG.011A Smile Is Made with the Zygomaticus Muscle, Not the MouthA smile is made by lifting the cheeks below the eyes, not pulling the lip corners sideways. Showing 3 mm of upper front teeth is the benchmark for a professional photo.
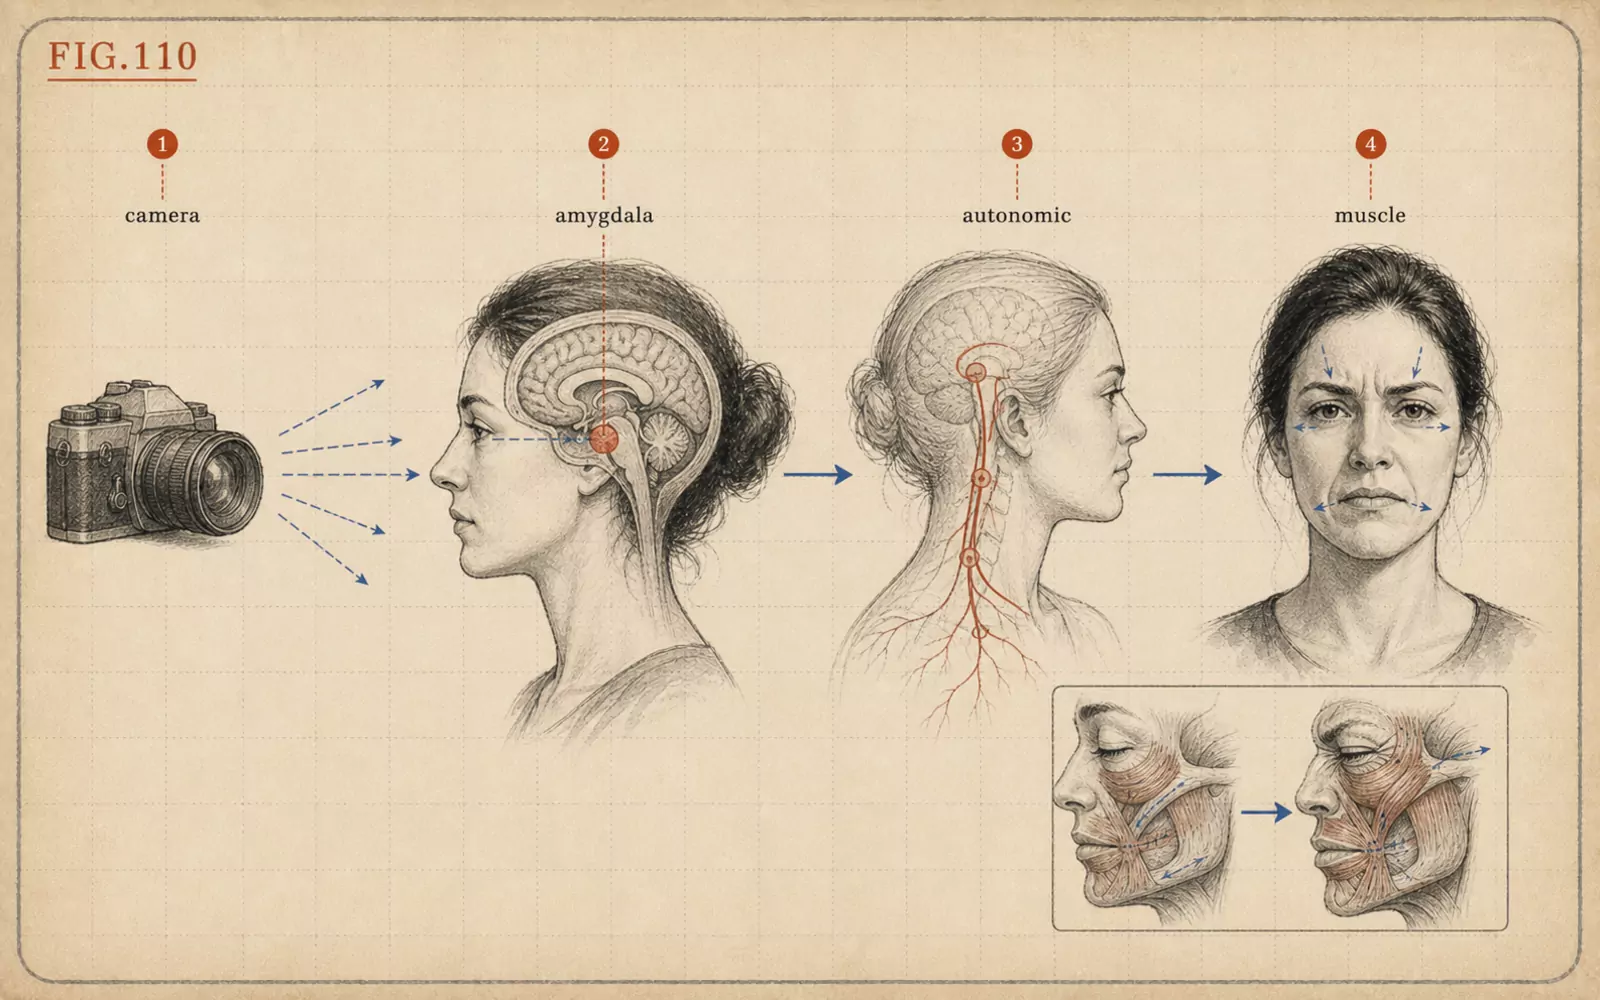 FIG.110The Truth About Camera Anxiety: Why Your Body Freezes When a Camera Is Pointed at YouFreezing in front of a camera is not a failure — it's your body's defensive response. Addressing breath, shoulders, and gaze separately makes it manageable.
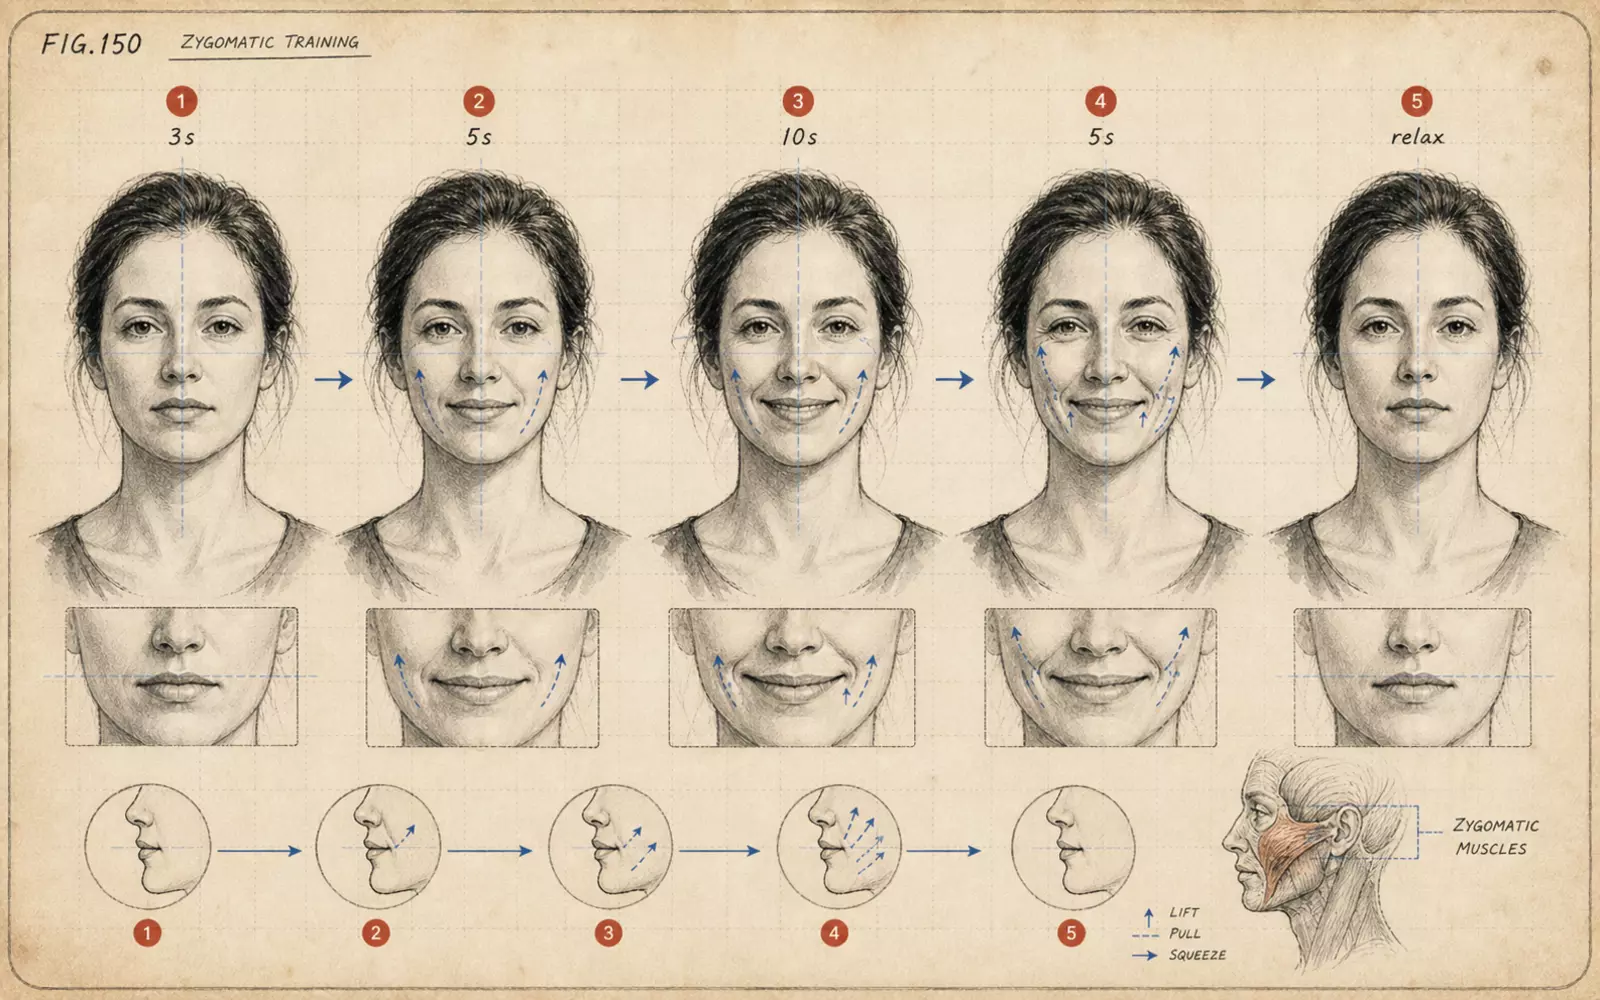 FIG.150Training to Lift the Zygomaticus Muscle: A 3-Minute Daily RoutinePractice building the sensation of moving the cheeks upward before trying to make a smile with your mouth.