This Article Contains
The Shift in Thinking: Build Your Smile from the Cheeks
When making a smile, the first thing to move is not the mouth but the cheeks. Specifically, lift the area just below the cheekbones slightly. When the cheeks rise, the eyes join in naturally, and the upper and lower halves of your expression start to unify.
The "E" smile — pulling the mouth sideways — moves only the mouth while leaving the cheeks still, so the smile never travels to the eyes. Looking at the result in a mirror, you often find a face where "the mouth is smiling but the eyes are not."
In professional profile photos, this "upper-lower unity" is especially important. A trustworthy expression is born when the eyes and mouth are smiling at the same emotional level.
Why Moving Only the Mouth Corners Never Reaches the Eyes
Roughly speaking, the muscles that move the mouth and the muscles that move the cheeks and eye area are separate groups. Pulling the mouth corners sideways primarily engages the former. The latter — the zygomaticus major — is activated by lifting the cheeks.
When the zygomaticus does not engage, the area below the eyes stays still and no expression reaches them. This is the fundamental reason a "forced smile" looks forced.
When you build a smile from the cheeks, the zygomaticus activates and the movement carries all the way to the eyes. Subtle fine lines appear below the eyes, and the outer corners of the eyes soften. In this state, with a little of the upper teeth visible, viewers read the expression as a natural smile.
FIG. 011A diagram comparing a mouth-corners-only smile with a smile built from the zygomaticus. Left: cheeks not engaged. Right: smile starting from the cheeks.
Checking in the Mirror: Cheeks, Teeth, and Eyes
Try these three steps in front of a mirror before your shoot.
- First, make the "E" smile — Pull your mouth sideways and check whether your cheeks are moving. In most cases the mouth is active but the cheeks barely shift.
- Now lift only the cheeks, without pulling the mouth sideways — Imagine gently pressing upward on the area just below the eyes. If you notice a slight movement around the eyes, you have got it.
- From that position, show a little of the upper teeth — Stop once about 3 mm of the upper teeth are visible. Letting the lower teeth or gums show prominently can make the smile feel too intense.
Once you have locked in this feeling, bring it back on shoot day. When tension pushes you back to a mouth-only smile, return to the thought "cheeks first."
Matching Smile Intensity to Its Purpose
More smile is not always better. Different contexts call for different amounts of smile.
For a hiring page or a profile where you want to convey approachability, a slightly brighter smile works well. For an attorney, healthcare professional, or executive introduction photo, a calm smile with just a little of the upper teeth visible lets trustworthiness come through first.
When you need to dial down your smile, reducing "how much tooth is showing" tends to keep your expression more flexible than closing your mouth completely. Closing the mouth fully tends to put tension in the lips and stiffen the whole expression — if you do close it, do so gradually and naturally.
If you feel on set that you would like a slightly less intense smile, telling your photographer "I'd like to show just a little bit of teeth" gives them something concrete to work with.
Checkpoints to Use Before and After a Shoot
Before the shoot, run through three checkpoints: cheeks, teeth, and eyes. Before you pull your mouth sideways, consciously lift the cheeks below the eyes.
During the shoot, avoid holding a smile for too long. Make a smile, let it go, make it again — this cycle keeps the cheeks from tiring and lets you maintain the expression. Especially when shooting dozens of frames in a row, think "a smile I can make again and again" rather than "one long held smile."
After delivery, when reviewing photos, do not look only at the mouth. Check the eyes and cheeks together. Look for a photo where the cheeks are lifted, the eye area is slightly soft, and the upper teeth are showing modestly — one that conveys both approachability and composure wherever it is used.
- Build your smile by lifting the cheeks (zygomaticus) below the eyes rather than pulling the mouth corners sideways.
- Stopping once about 3 mm of upper teeth are visible gives you a smile that is not too intense for professional photos.
- When selecting photos, check the softness of the eye area and the movement of the cheeks, not just the mouth.
Related Diagrams
 FIG.010The "Open Your Eyes Wider" Trap: Mismatched Expressions on the Upper and Lower FaceThe more you force your eyes open, the more your smile and your wide eyes can drift apart.
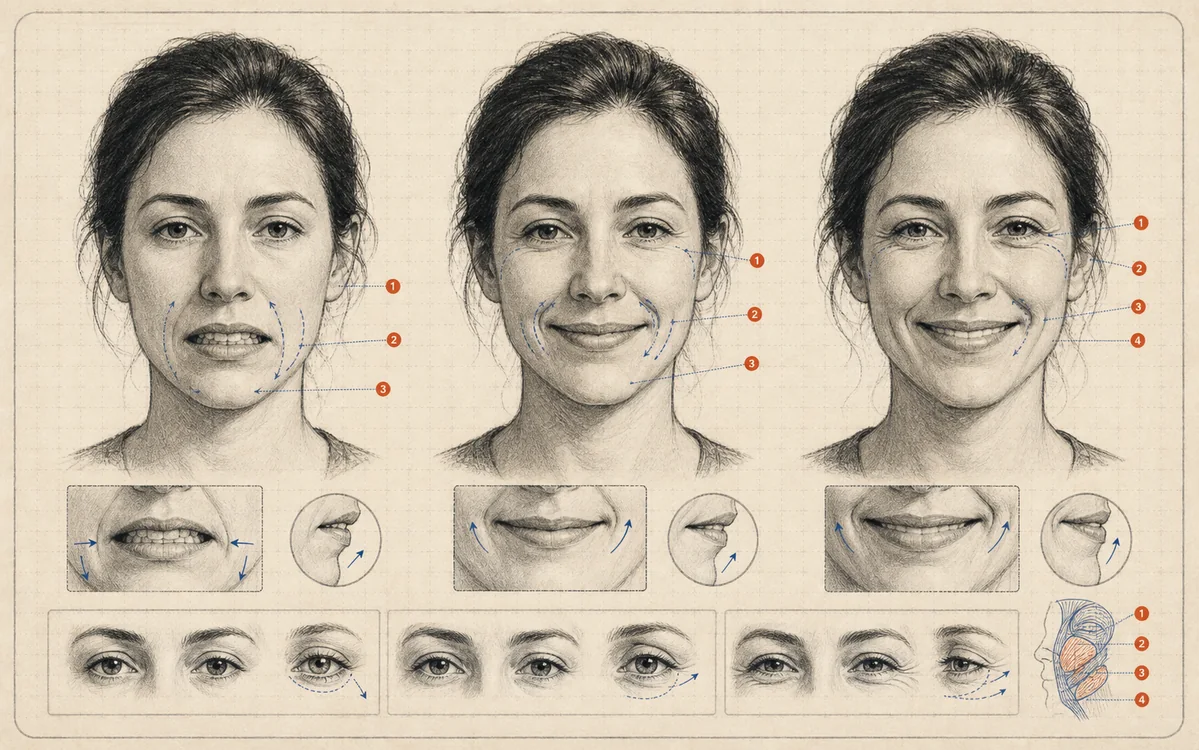 FIG.012Why "Please Smile" Freezes Your ExpressionA photo smile is not just about mood — it is shaped by lifting the cheeks, showing 3 mm of teeth, and catching the moment tension releases.
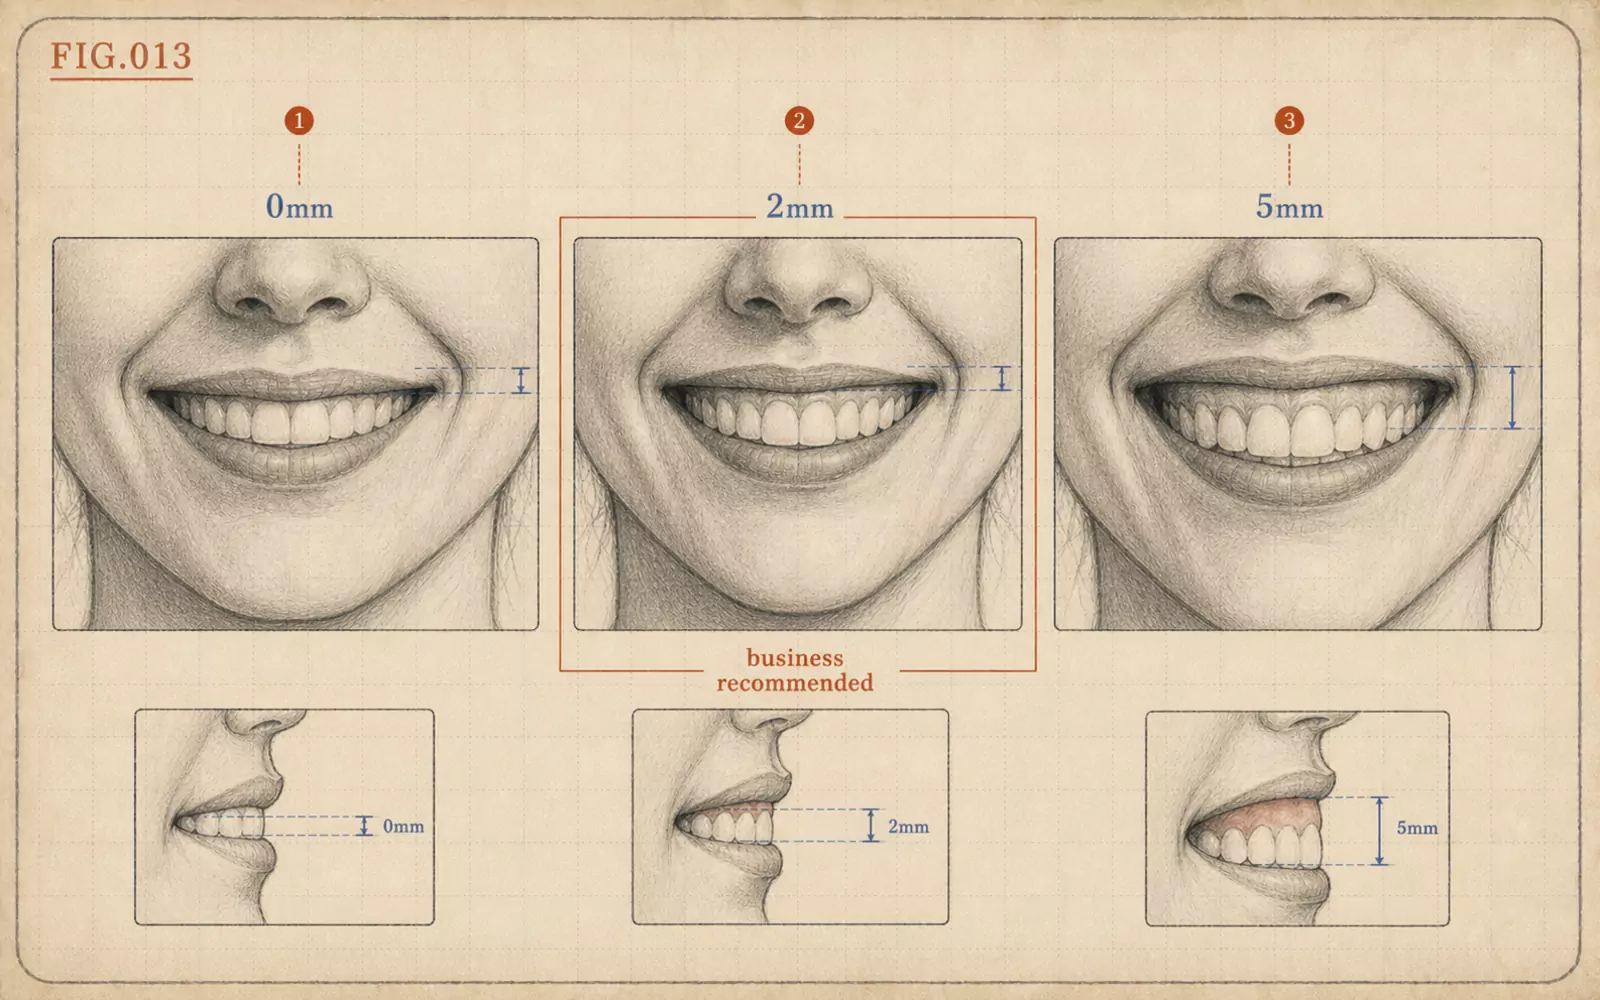 FIG.013The Gummy Smile 2 mm RuleRather than hiding a gummy smile, adjust the amount of smile for the context. For professional photos, 3 mm of upper teeth with minimal gum showing is the benchmark.